Circuit 1.5 Cycle through LEDs
Now let’s get a bit more fancy with the programming.
We’ll create a circuit with four LEDs in parallel, but only one LED will light up at a time. With the press of the button we will cycle through the LEDs, so that they light up one after the other.
This is actually quite complex! Let’s build up to it with a couple of steps!
Circuit with four LEDs and a button
Change the circuit so that you have four LEDs and each one is connected to a different pin on the Arduino. Don’t forget the resistors!
To test if things are wired correctly you can write some code to light all LEDs up when the button is pressed. (Basically what we had before)
int ledPin1 = 2;
int ledPin2 = 3;
int ledPin3 = 4;
int ledPin4 = 5;
int buttonPin = 12;

void setup() {
    pinMode(ledPin1, OUTPUT);
    pinMode(ledPin2, OUTPUT);
    pinMode(ledPin3, OUTPUT);
    pinMode(ledPin4, OUTPUT);
    pinMode(buttonPin, INPUT);
}

void loop() {
  buttonState = digitalRead(buttonPin);
  digitalWrite(ledPin1, buttonState);
  digitalWrite(ledPin2, buttonState);
  digitalWrite(ledPin3, buttonState);
  digitalWrite(ledPin4, buttonState);
}
Running lights
But we want cyclic behaviour, and there is an operant which is perfect for that!
It’s modulo, aka %, aka the remainder!
With modulo in mind, change the code so that we have a counter that counts up and is responsible to light up an LED for a second before moving on to the next.
(One possible) Solution
int ledPin1 = 2;
int ledPin2 = 3;
int ledPin3 = 4;
int ledPin4 = 5;
// int buttonPin = 12;
int counter = 0;

void setup() {
    pinMode(ledPin1, OUTPUT);
    pinMode(ledPin2, OUTPUT);
    pinMode(ledPin3, OUTPUT);
    pinMode(ledPin4, OUTPUT);
    //pinMode(buttonPin, INPUT);
}

void loop() {
  // buttonState = digitalRead(buttonPin);
  digitalWrite(ledPin1, LOW);
  digitalWrite(ledPin2, LOW);
  digitalWrite(ledPin3, LOW);
  digitalWrite(ledPin4, LOW);

  counter = (counter + 1) % 4;
  digitalWrite(counter + 1, HIGH);

  delay(1000);
}
Bring back the button
Last step, instead of running by itself, we want to change the LED via the press of the button.
To see if the button was just pressed instead of continually pressed, we need to keep track of its current state and previous state. We can do that with two boolean variables.
Solution
int ledPin1 = 2;
int ledPin2 = 3;
int ledPin3 = 4;
int ledPin4 = 5;
int buttonPin = 12;
int counter = 0;

bool buttonState = false;
bool lastButtonState = false;

void setup() {
    pinMode(ledPin1, OUTPUT);
    pinMode(ledPin2, OUTPUT);
    pinMode(ledPin3, OUTPUT);
    pinMode(ledPin4, OUTPUT);
    pinMode(buttonPin, INPUT);
}

void loop() {
  buttonState = digitalRead(buttonPin);

  digitalWrite(ledPin1, LOW);
  digitalWrite(ledPin2, LOW);
  digitalWrite(ledPin3, LOW);
  digitalWrite(ledPin4, LOW);

  if (buttonState && !lastButtonState) {
    counter = (counter + 1) % 4;
  }
  digitalWrite(counter + 1, HIGH);

  lastButtonState = buttonState;
  delay(1000);
}
Did you notice strange behaviour?
Our buttons are mechanical but we treat their state als digital signals.
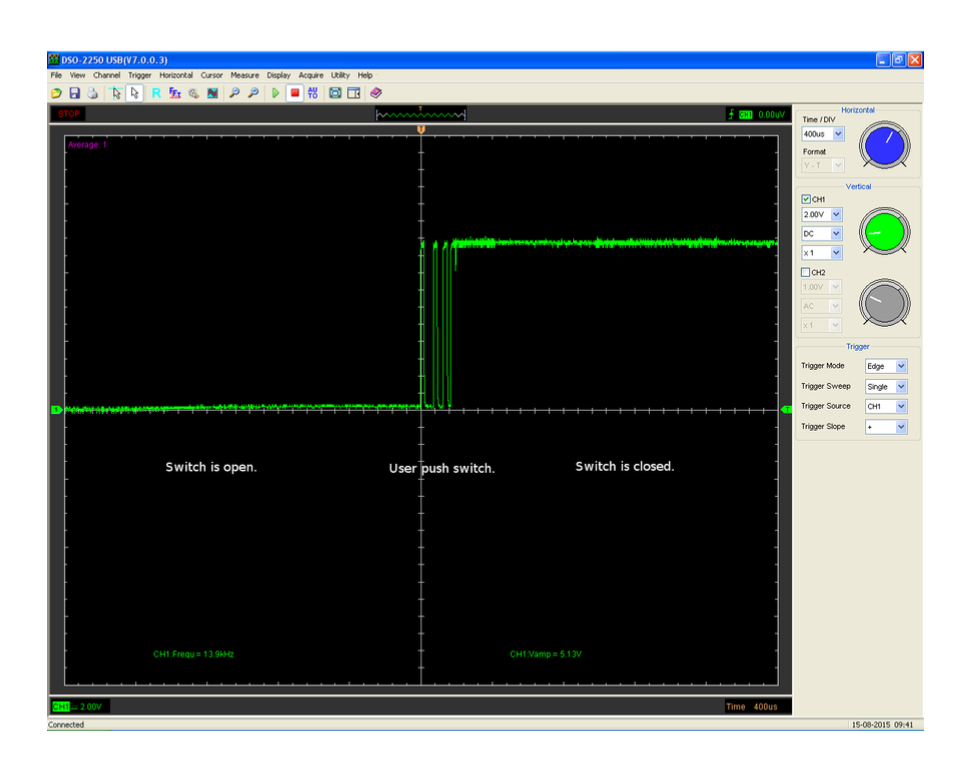
-> The physical state of the button can produce values inbetween ON and OFF that our program might interpret as either.
We can solve this programmatically by adding a short (e.g. 20ms) delay or adding a debounce timer or using bitshift logic. We can also solve this with another hardware component called capacitor.
But it’s been a long day so we will end it here :)
Just keep in mind that we are dealing with physical things and they exist outside of a computer binary!